
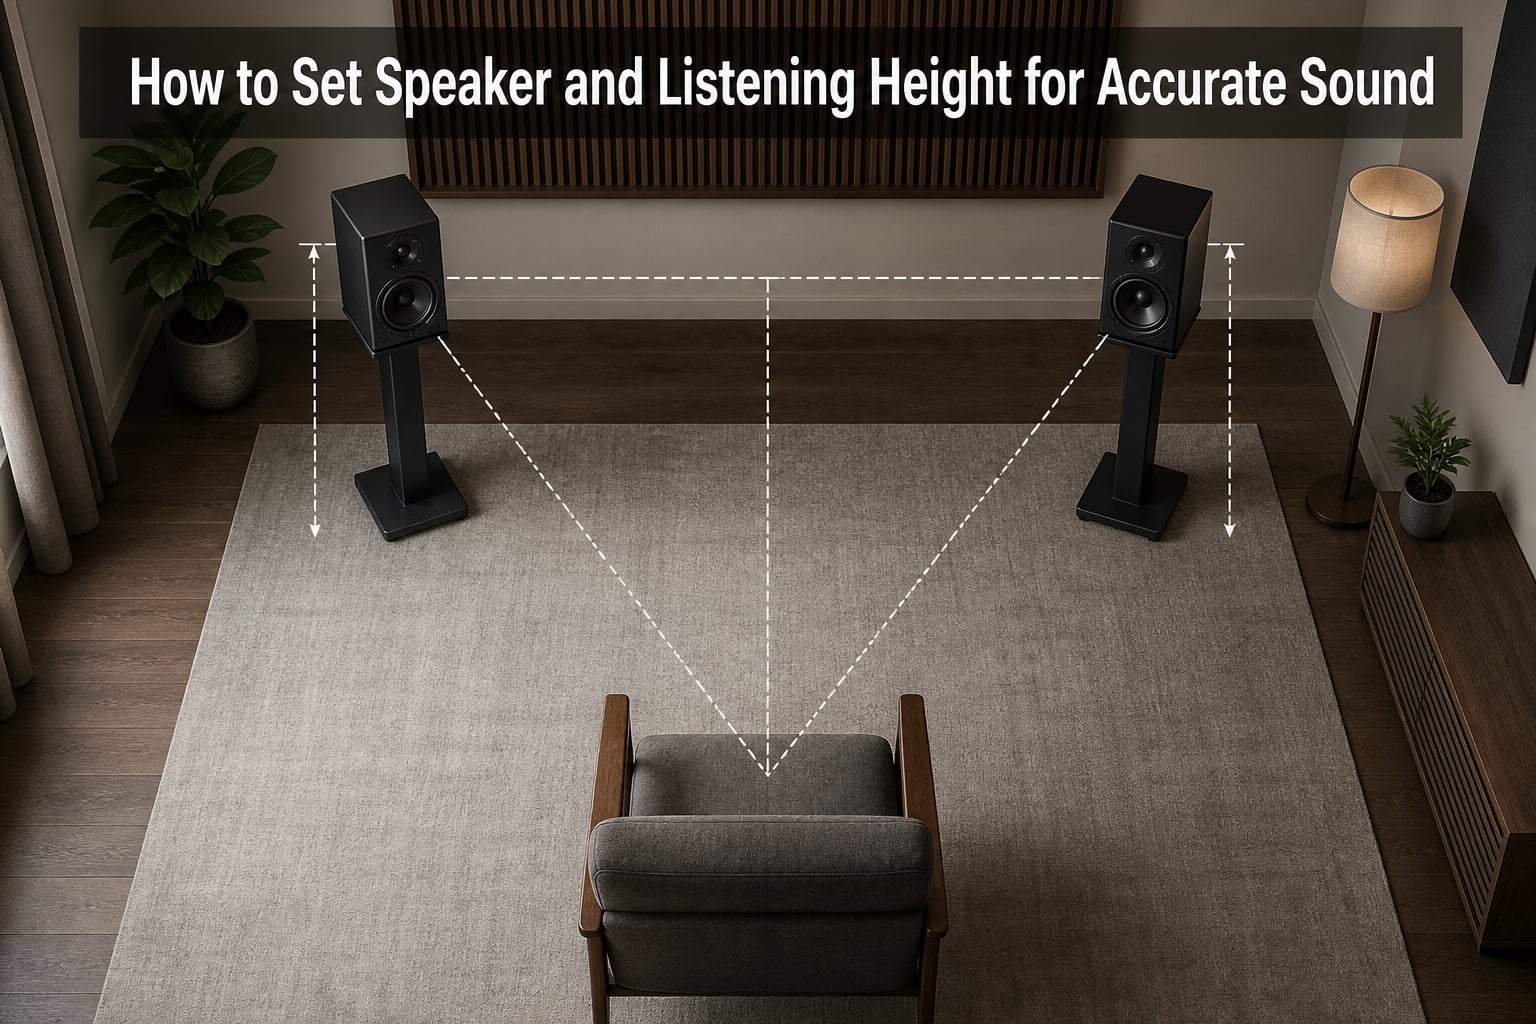
Getting your speaker and listening height right is the single most overlooked step in home audio setup. When I set up my first stereo system, I spent weeks obsessing over cables and amplifiers while my speakers sat at the wrong height on a media console. The result was muddy imaging and a flat soundstage that no upgrade could fix.
This guide will walk you through exactly how to set speaker and listening height for accurate sound. I will share the measurements, formulas, and techniques I now use when setting up any system, whether it is a two-channel stereo rig, a home studio, or a full surround sound arrangement. By the end, you will know how to position your speakers so the tweeters align with your seated ear height, build an equilateral triangle with your listening position, and avoid the acoustic traps that most beginners fall into.
Table of Contents
Why Speaker and Listening Height Matters for Accurate Sound
Speaker and listening height directly controls how sound waves reach your ears. When the tweeter sits at the same height as your ears, the direct sound arrives at the correct angle and timing, preserving the stereo cues the recording engineer baked into the mix.
If the tweeter fires above or below your ear, those high frequencies arrive at the wrong angle. Your brain then scrambles the spatial information, and the soundstage collapses into a vague wash instead of distinct instruments placed across an imaginary stage. This is called time smearing, and it is the reason off-axis listening sounds unfocused.
I learned this the hard way with a pair of floorstanding speakers in my living room. The tweeters sat 48 inches off the floor while my seated ears sat at 38 inches. Every track sounded slightly hollow, and vocals seemed to come from below the speakers. After raising the front baffles by 6 inches using isolation platforms, the difference was night and day. The midrange tightened, and voices snapped into focus at eye level.
Proper speaker height also affects how your room interacts with the sound. Speakers placed too close to the floor boost certain bass frequencies through floor reflection, while speakers mounted too high lose early reflections that help your brain localize instruments. The sweet spot is at ear level, with enough clearance for clean dispersion.
The Golden Rule: Tweeters at Ear Level
The single most important rule for speaker and listening height is this: align the tweeters of your speakers with your ears when seated at the listening position. This is the foundation that every other adjustment builds on.
Why tweeters specifically? Tweeters reproduce high frequencies from roughly 2 kHz upward. These short wavelengths are highly directional, meaning they behave more like beams than waves. If the tweeter fires past your ear instead of into it, you lose high-frequency detail and air. The result is a dull, closed-in sound.
Most speaker designers tune their crossovers and dispersion patterns assuming the listener sits with the tweeter at ear level. Deviating from this assumption changes the tonal balance the designer intended. When I work with studio monitors, I treat ear-level tweeter placement as non-negotiable. Even a 2-inch error becomes audible on critical material.
For floorstanding speakers, this often means tilting the speaker backward slightly so the tweeter aims at your ears. For bookshelf speakers, it means choosing stands that bring the tweeter to the right height. The target measurement is typically 36 to 42 inches off the floor for seated listeners, depending on your chair and body proportions.
How to Measure Your Seated Ear Height
Before you can place speakers correctly, you need to know your seated ear height. Grab a tape measure and have someone help you with this quick process.
Sit in your normal listening position on the couch or chair you actually use. Keep your posture the way you listen to music, not ramrod straight. Relax your shoulders and let your head settle naturally.
Measure from the floor to the center of your ear canal. Have your helper hold the tape measure vertically beside your head. For most adults using a typical sofa or recliner, this measurement falls between 35 and 40 inches. Forum users on r/audiophile consistently report seated ear heights in the 35- to 45-inch range, with 38 inches being a common average.
Once you have your seated ear height, your job is simple: position the tweeters of your speakers at that exact height. If your stand puts the tweeter at 40 inches and your ears sit at 36 inches, you need a shorter stand, not a taller one. Getting within 1 to 2 inches is close enough for most rooms.
Speaker Stands and Decoupling for Proper Height
Speaker stands do two things at once: they set the correct height, and they decouple the cabinet from the floor. Decoupling prevents vibrations from transferring into the floor, which would otherwise create resonant interference and smear the bass.
For bookshelf speakers, a 28-inch stand is the most common choice. With a typical bookshelf design, this puts the tweeter at 38 to 40 inches off the floor, right in the seated ear height sweet spot. Users on audiophile forums report excellent results with this configuration in rooms with standard 8- to 9-foot ceilings.
Fill your stands with sand, lead shot, or specialized mass-loading material. A filled stand resists vibration far better than an empty one. I fill my stands with dry playground sand, sealed in plastic bags to prevent leakage. The added mass keeps the speakers stable during dynamic passages and tightens up the bass noticeably.
For floorstanders, decoupling happens through spikes or isolation feet. Spikes couple the speaker firmly to the floor for stability, while rubber or sorbothane pads decouple them for cleaner sound. Try both and listen for which sounds better in your room. Hard floors typically favor spikes on a rigid substrate; carpeted floors often sound better with isolation pads.
The Equilateral Triangle Rule for Speaker Placement
Once the height is right, the next step is getting the horizontal geometry correct. The equilateral triangle rule says that the distance between your two speakers should equal the distance from each speaker to your listening position.
If your speakers sit 6 feet apart, your listening chair should sit 6 feet from each speaker. This creates an equilateral triangle with 60-degree angles at each corner. This geometry preserves the stereo image and gives the soundstage its proper width and depth.
I use a simple method to set this up accurately. I start by placing the speakers roughly where I want them, then I sit in my listening chair with a tape measure. I measure the distance from my nose to the center of each speaker’s tweeter. I adjust the speakers until both measurements match each other and match the distance between the speakers themselves.
Small rooms call for smaller triangles. In a 10-by-12-foot room, a 5-foot triangle works better than a 7-foot one. Larger rooms can stretch out to 8 or 9 feet between speakers. The triangle should fit comfortably within your room with at least 2 to 3 feet between each speaker and the nearest wall.
Distance from Walls and the Boundary Effect
Speakers placed too close to walls suffer from the boundary effect. Sound waves radiating backward from the cabinet reflect off the nearby wall and combine with the direct sound, boosting bass frequencies and smearing the stereo image.
Move your speakers at least 2 to 3 feet away from the nearest wall. This distance minimizes sound reflections that would otherwise muddy the playback. I have tested this in multiple rooms, and the difference between 6 inches from the wall and 3 feet from the wall can be 6 dB or more of bass boost. That is a massive tonal shift from a single placement decision.
Rear ported speakers need even more clearance. The port fires backward, and if it sits within a foot of the wall, the port output reflects immediately and overloads the bass. Front ported or sealed designs can sit closer to walls, but they still benefit from at least 12 to 18 inches of breathing room.
Corners are even worse than walls. A speaker placed in a corner receives reflections from two surfaces at once, doubling the boundary reinforcement. If bass sounds boomy and undefined, pull the speakers away from corners and see if the low end tightens up.
Finding Your Optimal Listening Position with the 38% Rule
The 38% rule gives you a mathematical starting point for finding your listening position. This rule minimizes the effect of room modes, which are resonant frequencies that build up between parallel walls.
Measure the length of your room from the wall behind your speakers to the wall behind your listening chair. Multiply that length by 0.38. The result tells you where to place your listening position from the front wall. For a 20-foot room, 20 times 0.38 equals 7.6 feet. Place your chair 7.6 feet from the front wall.
This position avoids the worst bass nulls and peaks caused by axial room modes. It also keeps you out of the wall boundary zone where low-frequency reinforcement becomes excessive. I have used this formula in three different rooms and it consistently delivers smoother, more even bass than random chair placement.
For the 38% rule to work well, avoid placing your listening position at exactly 50% of the room length. The center point is the worst possible spot because it sits on top of every room mode. Similarly, avoid the wall zones within the first foot or last foot of the room. Both extremes produce exaggerated, uneven bass.
Avoiding Vertical Midpoint and Symmetry Principles
Beyond horizontal positioning, your speaker height should also avoid the vertical midpoint between floor and ceiling. This is an acoustic principle that most home audio guides overlook.
The vertical midpoint of your room is where ceiling and floor reflections interact most strongly. Speakers placed at this height receive equal reflection energy from above and below, creating comb filtering and cancellation artifacts. Place your speakers and your listening position so neither sits at exactly half the ceiling height.
Symmetry is the other critical principle. Your left and right speakers should mirror each other relative to your listening position. Equal distances, equal heights, equal angles. Any asymmetry causes the stereo image to lean toward one side.
I once helped a friend set up a system where one speaker sat on a shelf and the other sat on a stand due to furniture constraints. Despite identical speakers, the soundstage pulled dramatically toward the lower speaker. After raising both to equal height, the image centered perfectly. The lesson was clear: symmetry matters as much as the absolute height.
Toe-In Angle Adjustment for Better Imaging
Toe-in is the angle at which your speakers point toward your listening position. Adjusting toe-in fine-tunes the soundstage width and the strength of the stereo image.
Start with the speakers pointing straight ahead, with no toe-in. Sit in your listening position and listen to a track with strong stereo content, like a well-mixed acoustic album. Notice the width of the soundstage and how clearly you can localize each instrument.
Now angle each speaker inward by about 15 to 30 degrees, aiming the tweeters at your ears or just behind your head. This focuses the stereo image and sharpens instrument placement. Most listeners prefer this configuration for critical two-channel listening.
Pull the speakers back to less toe-in if the sound feels too narrow or if the center image sounds recessed. Pulling them out wider softens the image but widens the soundstage. Experiment with small adjustments until the center image locks in and the soundstage extends slightly beyond the speakers.
Speaker Height for Surround Sound and Home Theater
Surround speakers follow different height rules than your front left and right speakers. The front three channels should still have their tweeters at ear level for accurate dialogue and music imaging. The surrounds work differently.
Place your surround speakers approximately 2 to 3 feet above your seated ear level. In a 7.2 or 5.1 setup, side and rear surrounds work well about 18 to 24 inches above ear level. This elevation creates the enveloping effect surround sound is designed to produce without pulling the sound away from the screen.
For Dolby Atmos height speakers, mount them in or on the ceiling above your listening position, slightly forward of the seating area. Atmos relies on overhead sound arriving from a clearly different direction than your ear-level speakers. Ceiling-mounted speakers at 7 to 8 feet handle this well in most residential rooms.
Quick Reference Checklist for Speaker and Listening Height
Measure your seated ear height before placing any speaker
Set tweeters within 1 to 2 inches of your seated ear height
Use 28-inch stands for most bookshelf speakers
Fill stands with sand or shot for better stability and cleaner bass
Build an equilateral triangle between speakers and listening position
Keep speakers 2 to 3 feet from the nearest wall
Apply the 38% rule to find your listening position along the room length
Mirror left and right speakers exactly for symmetric imaging
Adjust toe-in between 15 and 30 degrees for focused imaging
FAQs
What is the correct height for speakers?
The correct height for speakers places the tweeters at your seated ear level. For most adults using a typical sofa or chair, this means the tweeter should sit between 35 and 42 inches off the floor. Measure from the floor to your ear canal while sitting in your normal listening position, then match that height with your speakers or stands. Deviating more than 2 inches from ear level causes high frequencies to arrive at the wrong angle, dulling the treble and collapsing the stereo image.
What is the 38% rule for speaker placement?
The 38% rule is a formula for finding your optimal listening position along the length of your room. Measure the distance from the wall behind your speakers to the wall behind your listening chair, then multiply that number by 0.38. The result is where to place your chair. For a 20-foot room, 20 times 0.38 equals 7.6 feet from the front wall. This position minimizes the impact of axial room modes and gives you the smoothest, most even bass response.
Should speakers be at ear level or knee level?
Speakers should always be at ear level, never knee level. Knee-level placement forces high frequencies to travel upward toward your ears, arriving at the wrong angle and creating time smearing that muddles the stereo image. Ear-level placement ensures direct sound reaches your ears before reflections, preserving the spatial cues in the recording. Knee-level placement is a common mistake with shelf-mounted speakers and is the easiest problem to fix in any system.
What is the 83% rule for speakers?
The 83% rule applies to side wall reflection points in your room. It suggests placing acoustic absorption panels at the point where a sound wave from a speaker hits the side wall before reaching your ears. This point sits roughly 83% of the way from the speaker to the listener along the side wall. Treating this reflection point reduces early reflections that interfere with stereo imaging. The rule is a complement to, not a replacement for, proper speaker and listening height setup.
Final Thoughts on Setting Speaker and Listening Height
Setting speaker and listening height for accurate sound comes down to a handful of measurements and a few well-established rules. Align your tweeters with your seated ear height, build an equilateral triangle with your speakers, keep 2 to 3 feet between speakers and walls, and use the 38% rule to place your listening chair.
These adjustments cost nothing and require no new equipment. I have seen systems worth thousands of dollars held back by bad placement, and I have seen budget setups sing simply because the owner took the time to measure and position everything correctly. Spend an afternoon with a tape measure and your favorite reference tracks. Your speakers already have the capability to image and reproduce the music accurately. Your job is to give them the geometry they need to do it.