
If you’ve ever recorded vocals in a bedroom, a closet, or any room without acoustic treatment, you’ve probably heard it. That hollow, ringing, “I’m recording in a bathroom” sound. I call it boxy echo, and it’s the reason most beginner recordings sound amateur. The good news is there’s a simple, affordable fix: a reflection filter. In this guide, I’ll walk you through exactly how to set up a reflection filter around a condenser mic, step by step, with the exact distances and angles that work.
I’ve spent the last few years recording vocals in untreated rooms, and a properly configured reflection filter has saved me more recordings than any plug-in. By the end of this article, you’ll know exactly where to place it, how close it should sit to your condenser microphone, and how to test whether your setup is actually doing its job.
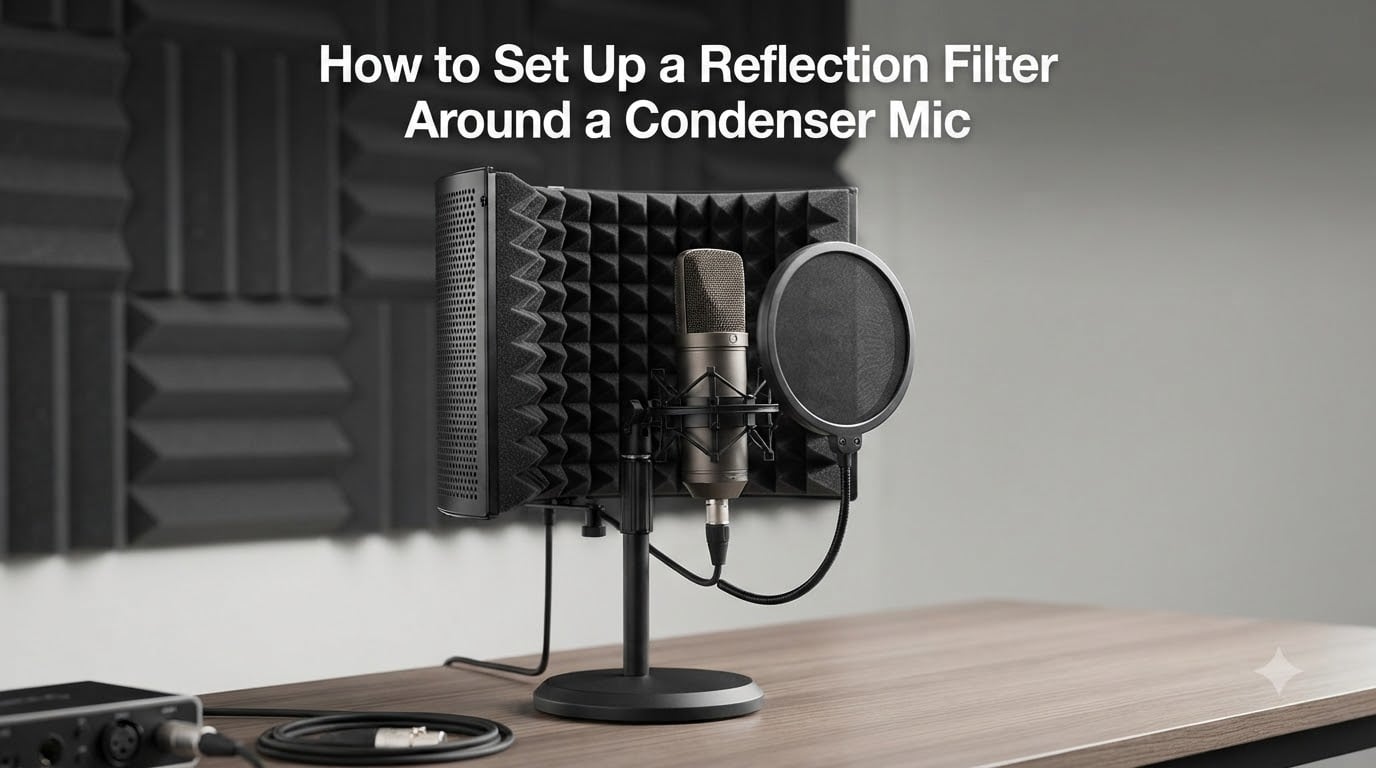
Here’s a quick answer for anyone in a hurry: Mount your condenser mic on its stand, attach the reflection filter to the same stand behind the mic, position the curved side facing the mic, leave 4 to 6 inches of space between the filter and the back of the mic, and angle the filter so it surrounds the rear and sides of the capsule. Now let’s break that down properly.
Table of Contents
What Is a Reflection Filter and How Does It Work
A reflection filter is a portable acoustic shield that surrounds a microphone to absorb room reflections before they hit the mic capsule. It looks like a curved foam wall (sometimes a multi-layer panel) and mounts to the same stand that holds your microphone.
The Basic Design of a Reflection Filter
Most reflection filters have three layers: a rigid outer shell, a layer of absorptive foam, and sometimes a second layer of acoustic material. The curved shape isn’t a gimmick. It spreads reflections across the surface at angles rather than sending them straight back into the mic.
Entry-level models use a single layer of foam wrapped around a plastic shell. Higher-end units (like the sE Electronics Reflexion Filter Pro) use multiple layers with air gaps between them to trap a wider range of frequencies. The principle is the same across all of them: stop reflections from your walls, ceiling, and floor before they reach the back of the microphone.
Why Reflections Matter in Vocal Recording
When you sing into a microphone in an untreated room, your voice bounces off the walls, ceiling, and desk, then returns to the mic a few milliseconds later. The mic picks up both the direct signal and the reflections simultaneously, creating comb filtering. That comb filtering is what makes vocals sound “off” without you knowing exactly why.
A reflection filter attacks that problem from the source. It absorbs reflections coming from behind and to the sides of the mic, which is where most problem reflections originate when you’re singing into a cardioid mic.
Microphone Pickup Patterns and Why Cardioid Matters
Before you set up your reflection filter, you need to understand which sounds your condenser microphone is actually picking up. That depends on its polar pickup pattern, and this is where most beginners get confused.
Cardioid, Omni, and Figure-8 Explained Simply
A cardioid microphone is most sensitive to sound directly in front of it and rejects sound from the back. It looks like a heart shape on a graph (hence “cardioid”). Most condenser mics you’ll buy for vocals, voiceover, or podcasting are cardioid.
An omnidirectional mic picks up sound equally from all directions. A figure-8 (bidirectional) mic picks up sound from the front and back but rejects the sides. Different patterns need different treatment, but for this guide we’re focused on the cardioid condenser, since that’s what 90% of home recordists use.
Here’s why this matters: a cardioid mic still has some rear pickup. It’s not deaf behind it. So reflections coming from behind the mic still get recorded, especially low and mid frequencies. That’s exactly where a reflection filter earns its keep.
If you’re recording with an omnidirectional mic, a reflection filter won’t help much because the mic is equally sensitive to reflections from every direction. You’d need real acoustic treatment instead. But for the common cardioid condenser scenario, a reflection filter works very well.
How to Set Up a Reflection Filter Around a Condenser Mic
This is the heart of the article. I’ll walk you through each step in order. The whole process takes under 5 minutes once you’ve done it a few times.
Before you start, make sure you have a mic stand with a horizontal boom arm. Most reflection filters are designed to attach to the same stand as the mic, so you need that single mounting point. Most budget stands include one; if yours doesn’t, plan on an upgrade.
Step 1: Mount the Condenser Mic on Its Stand
Set up your mic stand at seated or standing height depending on whether you record sitting or standing. Attach the shock mount to the boom arm, then carefully place your condenser microphone inside the shock mount. Tighten the shock mount screws just enough to hold the mic securely without crushing it.
Position the mic so the front (the side with the logo or the side that’s most sensitive) faces away from your computer and monitors. That’s the side you’ll sing or speak into.
Step 2: Attach the Reflection Filter to the Stand
Most reflection filters come with a clamp or mounting bracket that slides onto the vertical pole of your mic stand. Open the clamp, slide it onto the pole below where the boom arm attaches, then tighten it so the filter hangs securely.
If your filter has a separate “arm” extension that slides forward toward the mic, attach that now. This piece moves the filter panel closer to the microphone without requiring the stand itself to be repositioned.
Step 3: Position the Filter Behind the Microphone
Here’s the key positioning detail most guides leave out. The reflection filter should sit behind the condenser mic, with the curved (absorptive) side facing the back and sides of the microphone. The flat or hard side faces away from you, into the room.
Imagine the mic is in the center of a clock face, with you (the singer) at the 6 o’clock position. The reflection filter goes at roughly the 12 o’clock position behind the mic, curving around so it also covers the 11 o’clock and 1 o’clock zones (the rear sides of the mic).
Step 4: Adjust the Distance (4 to 6 Inches)
Now slide the filter as close to the mic as the mounting hardware allows, but leave a 4 to 6 inch gap between the back of the mic and the inside curve of the filter. This gap is important: the filter is designed to absorb reflections, not to physically touch the mic.
Most setups end up between 3 and 6 inches of clearance. If your filter is touching the back of the mic, pull it back. Too close kills the absorption efficiency because sound can’t fully interact with the foam surface before bouncing.
Step 5: Add a Pop Filter if You Sing or Speak Hard
The reflection filter handles room reflections. A pop filter handles plosives, those hard “p” and “b” sounds that thump into the mic capsule. They’re different jobs, and you often need both.
Mount your pop filter on a separate small boom arm attached to your desk or stand, positioned about 2 to 4 inches in front of the mic, between your mouth and the microphone. It should sit just below mouth level so it doesn’t block your sightline to any notes or scripts.
Pro tip: if you’re doing spoken word or softer vocals, you may not need a separate pop filter. But for singing, especially in hip-hop, rock, or aggressive voiceover, it’s essential.

Understanding the 3-to-1 Rule for Microphone Placement
The 3-to-1 rule is one of the simplest ways to get cleaner recordings, and it pairs perfectly with a reflection filter setup. The rule says that when you have two microphones recording the same source, each mic should be at least three times farther from the other mic than the second mic is from the source.
In practical terms for a single-mic vocal recording: keep your microphone at least three times farther from any reflective surface than it is from your mouth. If you’re 8 inches from the mic, the nearest wall should be at least 24 inches (3 × 8 inches) behind or beside the mic.
This rule exists because sound loses roughly half its energy every time the distance from the source doubles. By the time a reflection travels to a wall and back, it’s much quieter. Three times the distance gets that reflected energy below the threshold your ear can easily detect.
A reflection filter doesn’t replace the 3-to-1 rule. It complements it. The filter absorbs reflections that the rule can’t catch, especially from surfaces that are simply too close to move (like a ceiling or a desk).
Testing Your Reflection Filter Setup
Setting up the filter isn’t enough. You need to verify it’s actually working. Here’s the simple test I run every time I change my setup.
Record a 30-second clip of yourself speaking or singing at a normal level. Then remove the reflection filter, record another 30-second clip of the exact same performance, and listen back to both with headphones. The difference should be clear: the version with the filter should sound drier, more focused, and closer to the mic.
If you can’t hear a difference, try these adjustments. Move the filter closer to the mic (within the 4 to 6 inch guideline). Make sure the curved side is actually facing the mic, not the room. Confirm the filter isn’t tilted upward or downward where it stops covering the rear pickup area of the mic.
A more scientific test: clap once loudly in the room while standing at your normal recording position. Listen for the ringing echo that follows. Now stand behind the reflection filter (on the side facing your computer) and clap the same way. The echo behind the filter should be much shorter and quieter. That’s the filter doing its job.
Common Mistakes to Avoid When Setting Up a Reflection Filter
I’ve made most of these mistakes myself, and I’ve watched other beginners struggle with the same ones. Here’s what to watch for.
Mistake #1: Putting the filter too far from the mic. If your filter sits 12 or 18 inches behind the mic, it stops being effective. Reflections can sneak around it from other angles. Pull it in to the 4 to 6 inch range.
Mistake #2: Facing the wrong direction. The curved, foam-covered side always faces the mic. The hard plastic side faces into the room. People mix this up constantly because some filters look similar from both sides.
Mistake #3: Treating the filter like full acoustic treatment. Reddit users and Gearspace pros consistently say the same thing: a reflection filter is not a substitute for room treatment. It fixes mic-local reflections but does nothing for the overall room sound. If your room is severely reverberant, you’ll still hear it.
Mistake #4: Tilting the filter so it only covers the ceiling. Many filters can pivot on their mounting. If yours is angled upward, it will catch ceiling reflections but miss the side and rear wall reflections that matter more for cardioid mics. Keep the filter centered behind the mic.
Mistake #5: Buying the cheapest filter and expecting pro results. Sub-$30 foam-only filters do very little compared to multi-layer units. That said, a cheap filter is still better than nothing for many home studios.
Tips for Getting the Best Sound From Your Condenser Mic
Once your reflection filter is set up properly, a few extra tweaks can push your vocals from “okay” to “really clean.” Here are the tips I’ve found matter most.
Get closer to the mic. A cardioid condenser mic actually sounds best 6 to 8 inches from your mouth. The closer you are, the more “proximity effect” you get, which adds warm low-end boost that flatters most voices.
Use the right gain staging. Condenser mics are sensitive, and it’s easy to overdrive your preamp. Aim for peaks around -12 to -6 dB on your recording meter. You want headroom for unexpected loud moments.
Treat the desk and floor too. Hard surfaces at the desk level bounce reflections back at the mic just like walls do. Putting a small piece of foam or a carpet sample under your mic stand helps. So does putting a rug on a hard floor.
Turn off noisy electronics while recording. Computer fans, mechanical hard drives, refrigerator hums, all of it bleeds into a sensitive condenser mic. Turn off what you can, especially during tracking.
Do at least one pass of acoustic treatment beyond the reflection filter. Even budget foam panels on the first-reflection points make a noticeable difference. If you only ever buy one acoustic upgrade beyond the filter, this is it.
FAQs
What is the 3 to 1 rule for microphones?
The 3-to-1 rule states that when recording the same source with two microphones, each mic should be at least three times farther from the other mic than it is from the source. For a single-mic vocal session, this means your microphone should be at least three times farther from any reflective wall than it is from your mouth. So if you sing 8 inches from the mic, keep the nearest reflective surface at least 24 inches away from the mic. This minimizes comb filtering from reflections.
What is a microphone reflection filter?
A reflection filter is a curved, foam-covered acoustic panel that mounts to your microphone stand behind the microphone. It absorbs sound reflections from the room, walls, ceiling, and floor before they reach the back and sides of a cardioid condenser mic. The result is cleaner vocal recordings with less room echo and comb filtering, especially useful in home studios without full acoustic treatment.
How do I set up a condenser mic stand and pop filter?
Set up your mic stand at seated or standing singing height, attach the boom arm, and mount the condenser mic in its shock mount. Then attach your reflection filter to the same stand, behind the mic, leaving 4 to 6 inches between the mic and the filter. Finally, add a pop filter on a separate small boom arm, positioned 2 to 4 inches in front of the mic between your mouth and the capsule. Face the curved foam side of the reflection filter toward the mic.
How do I make a condenser mic sound good?
To make a condenser mic sound good: get 6 to 8 inches from the mic for proximity warmth, set proper gain staging at -12 to -6 dB peaks, mount a reflection filter 4 to 6 inches behind the mic, add a pop filter 2 to 4 inches in front, treat the desk and floor with foam or rugs, turn off noisy electronics while recording, and add budget acoustic panels at the first-reflection points of your walls. These steps together produce clean, focused vocal recordings even in untreated rooms.
Final Thoughts on Reflection Filter Setup
Setting up a reflection filter around a condenser mic is one of the highest-leverage things you can do for your home studio vocals. It costs less than a single decent plug-in, takes about 5 minutes to install, and immediately reduces the room echo that makes bedroom recordings sound amateur.
Remember the core setup: condenser mic on its stand, reflection filter mounted to the same stand 4 to 6 inches behind the mic, curved foam side facing the mic, pop filter 2 to 4 inches in front of the mic. Add the 3-to-1 rule for any nearby reflective surfaces, run a quick A/B test, and your vocals will sound noticeably cleaner. Pair this with at least some budget acoustic panels over time, and you’ll have a setup that genuinely competes with expensive studios for vocal work.
1 thought on “How to Set Up a Reflection Filter Around a Condenser Mic (2026)”