
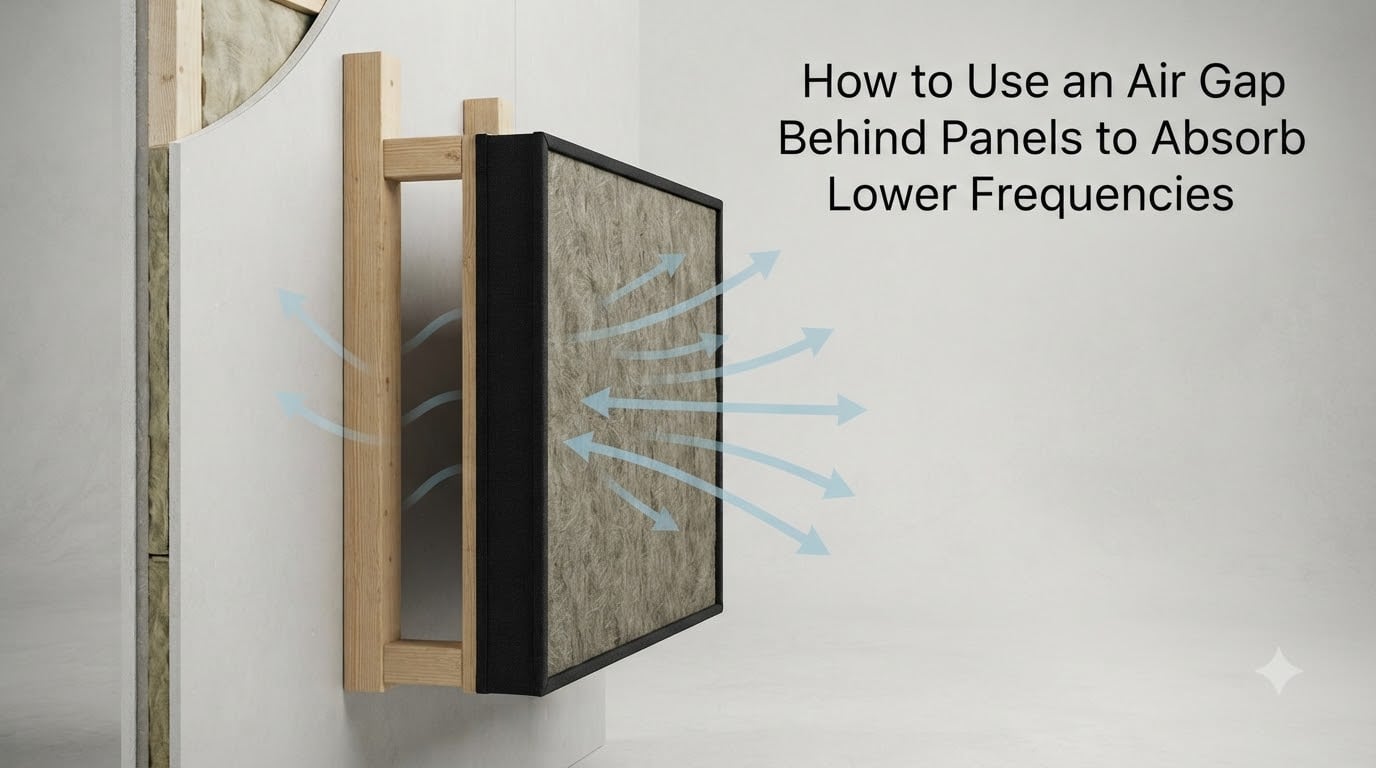
I still remember the first time I mounted acoustic panels flush against my studio walls. I had spent a weekend building six 4-inch panels out of mineral wool, framed them in pine, and proudly hung them in my home studio. When I measured the room afterward, the mid-range looked great but the bass was still ringing like a cathedral. That was the day I learned what an air gap behind panels actually does.
An air gap behind panels is the empty space between the back of an acoustic absorber and the wall behind it. That gap turns a 4-inch panel into something that behaves like a much thicker one, extending low-frequency absorption without adding material, weight, or cost. In this guide, I will walk you through exactly how to use an air gap behind panels to absorb lower frequencies, based on the same physics principles used by professional studio designers.
Table of Contents
What Is an Air Gap Behind Panels and Why It Matters
An air gap behind panels is the deliberate empty cavity left between the rear face of an acoustic absorber and the mounting surface. It is not wasted space. That empty volume changes how the panel interacts with sound waves, especially in the low and mid frequencies.
To understand why, you need to know two types of porous absorbers: velocity absorbers and pressure absorbers. A panel mounted directly on a wall sits in a pressure zone, where sound pressure is highest but particle velocity is near zero. Porous materials like mineral wool and fiberglass absorb poorly in pressure zones because absorption happens when sound waves move through fibrous material at speed.
When you pull the panel away from the wall, you create a velocity absorber. The air space behind the panel becomes a region of higher particle velocity, which is exactly where porous materials do their best work. The result is more absorption at the same frequencies, and absorption that extends deeper into the bass range.
How Air Gaps Extend Low-Frequency Absorption
The physics behind air gaps comes down to effective depth. A 2-inch panel mounted with a 4-inch air gap behaves acoustically like a 6-inch thick absorber, because the sound wave has to travel through 2 inches of material plus 4 inches of air space before reflecting off the wall.
This matters because of the quarter wavelength rule. Porous absorbers are most effective at frequencies whose wavelength is roughly four times their total depth. A 4-inch panel absorbs well around 850 Hz. The same panel with a 4-inch gap becomes effective around 425 Hz. Push the gap to 8 inches and you start taming frequencies near 280 Hz, which is right where many bass problems live.
In my own studio, I measured a 12 dB reduction in reverb time at 100 Hz after adding 6-inch gaps behind my 6-inch panels. The same panels mounted flush gave me only 4 dB at that frequency. That is the kind of real-world difference an air gap makes.
The 1:1 Ratio Rule for Air Gap and Panel Thickness
The most widely accepted guideline in the acoustics community is the 1:1 ratio. Leave an air gap equal to the thickness of your panel. A 2-inch panel gets a 2-inch gap. A 4-inch panel gets a 4-inch gap. A 6-inch bass trap gets a 6-inch gap. This rule comes up constantly in forums like Reddit r/Acoustics and Gearspace because it produces consistent, predictable results.
Why does 1:1 work so well? At this ratio, you double the effective depth of the absorber while keeping it in a strong velocity zone. The panel absorbs more total energy across the mid-bass region without creating the side effects you get from extreme gaps.
There is a real downside to overshooting. When the air gap becomes much larger than the panel thickness, you start to see a mid-frequency dip in the absorption curve. The panel becomes tuned to a narrower frequency band, leaving gaps in the 200 to 500 Hz range where many vocal and instrument problems live. Stick with the 1:1 rule unless you have a specific low-frequency target.
Air Gap Depth Recommendations by Frequency
Use the quarter wavelength reference below to choose your gap depth based on the lowest frequency you need to control. Divide the speed of sound (1,130 ft/s) by your target frequency, then divide by 4. That number is the total depth your absorber needs, panel plus gap combined.
| Target Frequency | Total Depth Needed | Example Setup |
|---|---|---|
| 40 Hz | 84 inches | 12 inch panel + 72 inch gap (impractical) |
| 60 Hz | 56 inches | 8 inch panel + 48 inch corner trap |
| 80 Hz | 42 inches | 6 inch panel + 36 inch corner trap |
| 100 Hz | 34 inches | 6 inch panel + 28 inch corner trap |
| 125 Hz | 27 inches | 4 inch panel + 23 inch gap |
| 200 Hz | 17 inches | 4 inch panel + 13 inch gap |
| 300 Hz | 11 inches | 4 inch panel + 7 inch gap |
| 500 Hz | 7 inches | 4 inch panel + 3 inch gap |
For most home studios, a 4-inch panel with a 4-inch gap (8 inches total) gives solid absorption down to around 280 Hz. That handles the majority of vocal and acoustic instrument problems. If your room has serious bass issues, you need thicker panels in corners, not bigger gaps in walls.
Corner vs Wall Placement Differences
Corners accumulate bass energy because two surfaces meet at right angles. Sound bounces back and forth between the walls, creating pressure buildup at low frequencies. This is why corners are the first place I treat in any room.
For corner bass traps, you can use the 1:1 rule with much thicker panels. A 6-inch panel straddling a corner with a 6-inch air space behind it creates a 12-inch deep absorber that reaches into the 100 Hz range. RealTraps has published measurement data showing that straddling a corner outperforms mounting the same panel parallel to one wall by a wide margin.
On flat walls, the air gap still helps, but the angle of incidence is different. Wall-mounted panels catch reflections more directly, so even a 2-inch gap can shift your absorption curve noticeably. I recommend at least a 2-inch gap on all wall panels, even if you cannot spare the depth for a full 1:1 setup.
Step-by-Step Guide to Mounting Panels With an Air Gap
Mounting panels with an air gap is straightforward once you understand the spacer system. Here is the process I use in every studio build I do.
Materials You Will Need
Acoustic panels (mineral wool or fiberglass, 2 to 6 inches thick)
Wood furring strips or metal Z-clips for spacers
Wall anchors rated for the panel weight
Drill, level, and measuring tape
Eye hooks or French cleats for heavy panels
Mounting Methods
The simplest method uses wood furring strips. Cut strips to match your panel depth and screw them to the wall first. Then screw or hook the panel into the strips, leaving the air gap behind it. This method is strong, adjustable, and works for panels up to 6 inches thick.
For heavier bass traps in corners, I prefer impaler clips mounted to wooden spacers. The impaler holds the panel securely while the spacer creates the gap. You can stack spacers to reach any depth. A 6-inch spacer plus a 6-inch panel gives you a 12-inch total absorber.
Spacer Solutions for Different Depths
Small gaps (1 to 2 inches) work well with standard Z-clips or even stacked picture frame wire. Medium gaps (3 to 4 inches) call for wood furring strips cut from 2x4s ripped down. Large gaps (5 to 8 inches) require dedicated spacer blocks or a framed mounting box built around the panel.
If you are building the panels yourself, frame the back with a deeper wood frame so the mounting point sits further from the wall. A panel with a 4-inch deep back frame and a 4-inch thick absorber core gives you your 4-inch air gap the moment you hang it.
Common Mistakes to Avoid With Air Gap Installations
The most common mistake I see is treating air gaps as a substitute for thick bass traps. A 2-inch panel with a 12-inch air gap will not absorb 60 Hz. You cannot cheat physics. The total depth still needs to meet the quarter wavelength rule.
Another mistake is leaving the edges of the air gap open. When air can flow around the edges of the panel, you lose some of the velocity zone effect. Seal the edges with thin wood strips or acoustic caulk if you want maximum absorption. RealTraps testing showed that edge sealing can add another 10 to 15 percent absorption at low frequencies.
Do not compress the panel material against the wall. If your spacer system squashes the rear of the panel, you reduce its effective thickness right where the low-frequency absorption happens. Leave the panel uncompressed and let the air do its job.
Finally, avoid mixing too many panel types and gap depths in one room. Consistency matters more than chasing the perfect setup. A room full of 4-inch panels with 4-inch gaps will perform better than a mix of 2-inch, 4-inch, and 6-inch panels with random spacing.
FAQs
Do you need an air gap behind acoustic panels?
Yes, an air gap behind acoustic panels significantly improves low-frequency absorption. By pulling the panel away from the wall, you place it in a velocity zone where porous materials absorb more efficiently, and you increase the effective depth of the absorber without adding material.
What is the best air gap depth for bass absorption?
The most reliable guideline is the 1:1 ratio. Match your air gap to the thickness of your panel. A 4-inch panel should have a 4-inch gap, and a 6-inch bass trap should have a 6-inch gap. This doubles the effective depth while keeping the panel in a strong absorption zone.
Can you leave too large an air gap behind a panel?
Yes. Gaps much larger than the panel thickness create a mid-frequency dip in the absorption curve, leaving 200 to 500 Hz under-treated. Stick to the 1:1 rule unless you are targeting a very specific low-frequency problem.
How does an air gap differ from using a thicker panel?
An air gap achieves similar low-frequency extension to a thicker panel at lower cost and weight. However, an air gap does not help if you need to absorb very deep bass below 100 Hz. For those frequencies, you need actual material depth in the corners.
Do air gaps work with acoustic foam or only mineral wool?
Air gaps work with any porous absorber, but the effect is most pronounced with dense materials like mineral wool and fiberglass. Acoustic foam is thinner and less dense, so the gains from an air gap are smaller and you will still struggle with bass frequencies below 300 Hz.
Conclusion
An air gap behind panels is one of the most effective free upgrades you can make to any acoustic treatment setup. By following the 1:1 ratio rule and matching your gap depth to the problems in your room, you can absorb lower frequencies without buying thicker, more expensive panels.
Start with your corners, use thick panels with matching gaps, and seal the edges. Measure your results with REW or similar software so you know what actually changed. If you want a deeper dive into building your own bass traps, explore our guides on mineral wool panel construction and corner mounting techniques.