
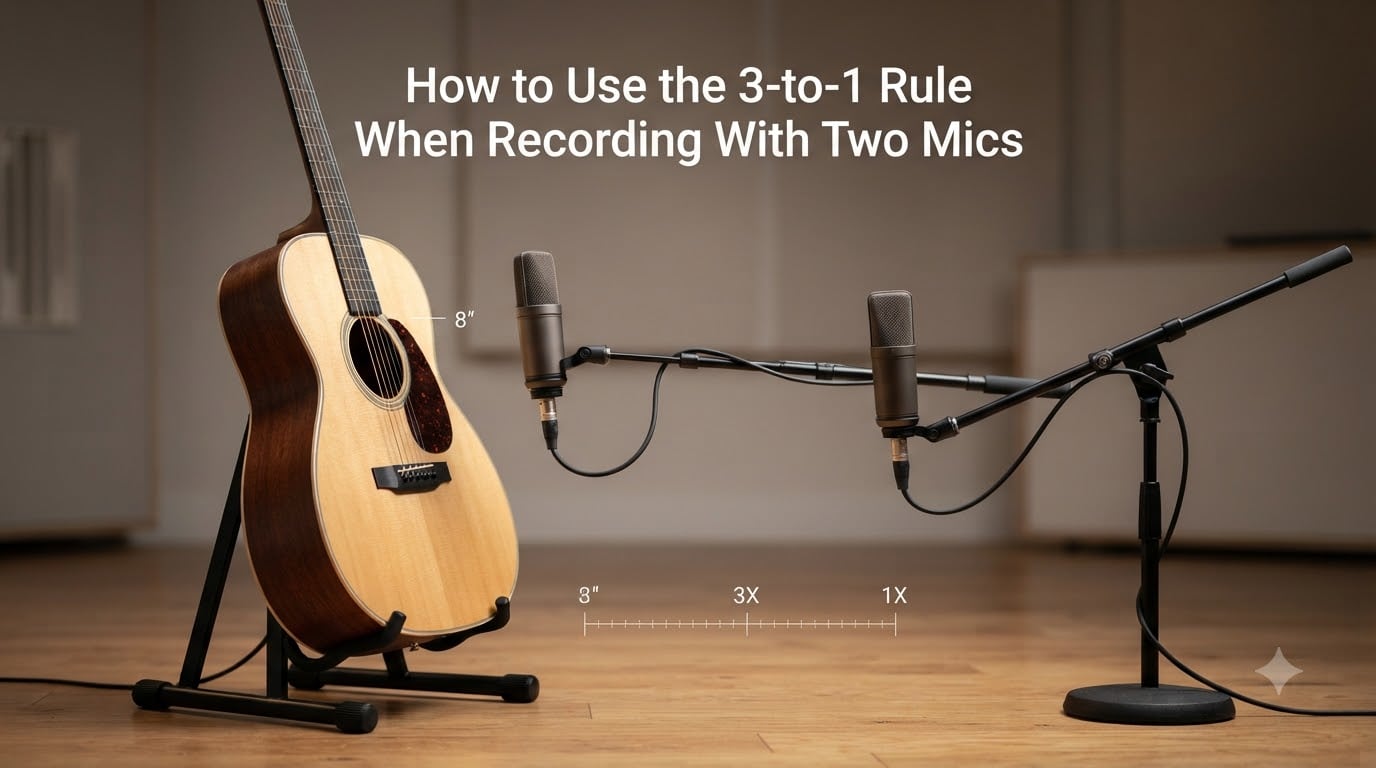
The 3-to-1 rule is one of the first microphone placement guidelines I learned when I started recording with two mics at once. It sounds simple, and it is simple, but it solves a problem that ruins more multi-mic recordings than almost anything else: phase cancellation.
Last spring I tracked acoustic guitar with two condenser mics without thinking about distance. The mix sounded thin, weird, and almost hollow in the lows. I soloed each mic and they both sounded fine. Combined, they fell apart. That was my first lesson in why the 3 to 1 rule microphone placement matters, and why I now teach it before anything else in my studio sessions.
In this guide I will walk you through how to use the 3-to-1 rule when recording with two mics, why the ratio works, the exact steps to apply it, and when experienced engineers deliberately break it. By the end you will be able to set up dual-mic sessions with confidence and avoid the most common phase problems.
Table of Contents
What Is the 3:1 Rule for Microphone Placement?
The 3:1 rule states that when you use two microphones to capture the same sound source, the second microphone should be placed at least three times farther from the source than the first microphone. If the closer mic is one foot from the source, the farther mic must be at least three feet from the source.
This ratio creates a minimum distance between the two microphones that is large enough to minimize audible phase cancellation when the two signals are summed, whether to mono or in a stereo bus. The principle is often stated as a source-to-mic ratio, but in practice it also controls the mic-to-mic distance, which is what really matters for phase coherence.
For a quick example: place mic A six inches from the soundhole of an acoustic guitar. To follow the 3 to 1 rule microphone placement, mic B needs to be at least eighteen inches from that same soundhole. The space between the two microphones will end up being roughly two feet, which is the real safety zone.
Why the 3:1 Rule Works: Phase Cancellation Explained
The 3:1 rule works because of how sound waves travel and combine. When two microphones capture the same source, the sound arrives at each mic at slightly different times. Even tiny differences in arrival time create phase relationships that can cancel certain frequencies when the two signals are summed.
If the second mic is placed too close to the first, the time difference between arrivals is small enough that the two signals interact destructively. The result is comb filtering, an audio artifact that creates a series of frequency peaks and dips across the spectrum. You hear it as a hollow, filtered, or phasey sound.
Here is where the 10dB level difference comes in. The rule of thumb is that the farther microphone should pick up the source at least 10dB quieter than the closer mic. Because every doubling of distance from a source cuts the level by roughly 6dB, tripling the distance gives you about 9.5dB, very close to the 10dB threshold. This level difference makes the farther mic’s contribution effectively masked by the closer mic for phase-sensitive frequencies, so cancellation becomes inaudible.
In other words, the 3:1 rule is not arbitrary. It is a practical engineering shortcut that produces a 10dB level difference, which is the real reason the rule minimizes phase cancellation.
How to Apply the 3:1 Rule Step by Step
Applying the 3 to 1 rule microphone placement is straightforward once you have a tape measure or a rough mental scale. Here is the exact workflow I use in my sessions.
Step 1: Place your primary microphone at the source. Choose the mic that will carry the core tone. For an acoustic guitar, that is usually a small-diaphragm condenser pointed at the 12th fret. Mark the distance from the source to the mic capsule, not the body.
Step 2: Measure that distance. Let’s say the primary mic sits six inches from the soundhole. That is your baseline number.
Step 3: Multiply by three for the second mic’s distance from the source. Six inches times three equals eighteen inches. The second mic must be at least eighteen inches from the soundhole, not from the first mic.
Step 4: Confirm the mic-to-mic gap. In most cases this works out to roughly twice the source-to-mic distance, which gives you a comfortable visual gap in the room.
Step 5: Angle the second mic for tone, not position. The 3:1 ratio is about distance, not aiming. Feel free to point the second mic where it captures the best complementary sound.
Step 6: Track a test pass and check in mono. Sum the two tracks to mono and listen. If the sound gets hollow, weak, or phasey, push the second mic farther away.
Real-World Recording Examples Using the 3:1 Rule
Numbers are easier to understand with concrete scenarios. Here are four common setups where the 3 to 1 rule microphone placement makes a real difference.
Electric Guitar Amps
When I double-mic a guitar cabinet, I place a dynamic mic like an SM57 on the cone at one inch from the grille. To follow the 3:1 rule, the second mic, often a ribbon or large-diaphragm condenser for room tone, sits at least three inches from the grille. If I want more room sound, I push the second mic back to six inches or more.
Acoustic Piano
Grand piano recordings often use two mics over the strings. Place the close mic about eight inches above the hammers for the percussive attack. The second mic should be at least twenty-four inches from the hammers to capture the bloom and resonance. This ratio keeps the strings sharp while letting the second mic add natural body.
Drum Overheads
For a basic two-overhead setup, place each mic about one foot above the cymbals and angled toward the kit. The distance between the two overheads becomes roughly two feet, which extends the 3:1 safety zone across the drum kit. This is one reason the spaced pair overhead technique works so well.
Vocals with Two Mics
Some engineers double-mic vocals with a large-diaphragm condenser for body and a ribbon for warmth. If the primary condenser is six inches from the singer, the ribbon needs to be at least eighteen inches away. Keep in mind that two vocal mics are usually the most phase-sensitive setup, so the mono check matters more than ever.
How to Test for Phase Issues in Your Recordings
Even when you follow the 3:1 rule, you should still test for phase issues. The rule is a guideline, not a guarantee, and room acoustics can shift things.
The fastest test is the mono summing check. Pan both mics to center, sum them to mono, and listen to the result. If the combined sound is thinner, weaker, or hollow compared to either mic soloed, you have phase cancellation.
The next test is the polarity flip. Most DAWs and many preamps have a polarity invert button. If a flipped polarity suddenly makes the sound fuller, your original setup was out of phase. Combine the invert with the 3:1 rule for the cleanest results.
Finally, use the mute-and-solo trick. Solo mic A, then solo mic B, then play both. If both sound great solo but the combined sound falls apart, the issue is phase, not mic choice. The fix is almost always more distance between the mics.
When You Can Break the 3:1 Rule
Experienced engineers break the 3:1 rule all the time, and that is okay. The rule exists for one purpose: minimizing comb filtering when mics capture the same source. When that condition changes, the rule’s priority changes too.
If the two microphones are pointed at different sources, such as snare top and snare bottom, or two separate instruments, the 3:1 rule does not apply. There is no shared source, so there is no phase relationship to protect in the same way.
You can also break the rule intentionally for creative effect. Some engineers place mics closer than 3:1 to capture comb filtering as a tonal color. Others ignore the rule when they intend to keep the signals fully separated in the stereo field with no mono summing.
In live sound, sources move. A singer steps back from the mic, a drummer shifts position. The 3:1 rule assumes a static source, so live engineers often rely more on cardioid pattern rejection than strict distance ratios. Keep the rule in mind, but prioritize practical feedback from the room.
Common Mistakes to Avoid With the 3:1 Rule
From my own sessions and from forum discussions with other engineers, I see the same mistakes show up over and over.
The first mistake is measuring the wrong distance. The 3:1 ratio is about source-to-mic distance, not mic-to-mic distance. A common forum question asks exactly this, and the answer is the same: measure from the source.
The second mistake is skipping the mono check. If you only ever listen in stereo, phase problems can hide, especially in a wide mix. Always collapse to mono before committing to a placement.
The third mistake is treating the rule as absolute. The 3:1 rule is a guideline based on a 10dB level difference. In some rooms and with some mic patterns, 2:1 works fine. In others, you need 4:1 or more. Trust your ears first, the rule second.
The fourth mistake is forgetting pattern rejection. A hypercardioid mic and an omnidirectional mic behave very differently at the same distance. Always factor in polar pattern when planning dual-mic setups.
Frequently Asked Questions
What is the 3:1 rule for placing two mics?
The 3:1 rule states that when using two microphones to capture the same sound source, the second microphone should be placed at least three times farther from the source than the first microphone. If the closer mic is one foot away, the second mic should be at least three feet away from the source. This spacing produces a roughly 10dB level difference that minimizes audible phase cancellation when the two signals are summed.
Why does the 3:1 rule minimize phase issues?
The rule works because tripling the distance from a source cuts the signal level by roughly 10dB. This level difference effectively masks the farther mic’s contribution at the frequencies most sensitive to phase cancellation, so comb filtering becomes inaudible when the two tracks are combined or summed to mono.
Can you record vocals with two mics?
Yes, you can record vocals with two microphones. Place the primary vocal mic at your normal working distance, usually six to eight inches, then position the second mic at least three times that distance from the singer’s mouth. Always check the combined signal in mono to confirm the two mics are phase-coherent before committing to the take.
When can I break the 3:1 rule?
You can break the 3:1 rule when the two microphones are pointed at different sources, when you want comb filtering as a creative effect, when the signal will never be summed to mono, or when live sound conditions require a different balance. The rule is a guideline for same-source miking, not a universal law.
Final Thoughts on Using the 3-to-1 Rule
The 3-to-1 rule for microphone placement is one of the most reliable tools in any recording setup. It is built on a simple physics principle: a 10dB level difference between two mics on the same source prevents the comb filtering that ruins multi-mic mixes.
Start every two-mic session by measuring the source-to-mic distance, multiplying by three, and placing the second mic at that minimum. Then track a short pass and listen in mono. If the sound is full and musical, the rule has done its job. If not, push the second mic farther back until the phase problems disappear.
Once you understand how to use the 3-to-1 rule when recording with two mics, you can also start experimenting with breaking it on purpose. Knowing the rule gives you the freedom to use it, ignore it, or bend it depending on what the song needs. That is the real goal: not blind obedience, but informed control.